HOW TO CONNECT TO CSULA CCOE WEB SERVER

Why use CSULA Web server

If you're a student on the go, staying connected is crucial. Access CSULA's network resources anytime and anywhere.
Use the server to keep your class work organized and securly backed up. Save content to host on the world wide web
Select what operation system you are working on?


Connecting to CSULA CCOE web server
using Microsoft Windows
This video will include the four steps explaing how to download the VPN host to connect to CSULA CCOE web server and how to navigate to find your file.
To acces your folder you will ned to complete the following steps. To view each step in individual detail click the link for detailed instructions or scroll below
Download school site VPN connection host
Install and set-up VPN connection program
Setting up connections to CSULA server
Navigating to your student folder
View the full video including all the steps necessary to connect to the CCOE server
Full screen player in new tab
Downloading the school site VPN connection host
using Microsoft Windows
- For best installation results update your computer's antivirus software and make sure you do not have multiple conflicting antivirus programs running simultaneously
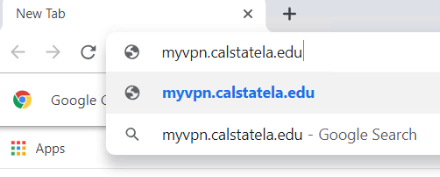
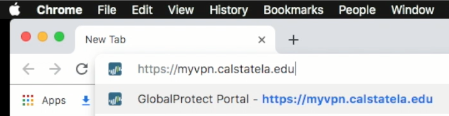
- Using your preferred browser navigate to https://myvpn.calstatela.edu/
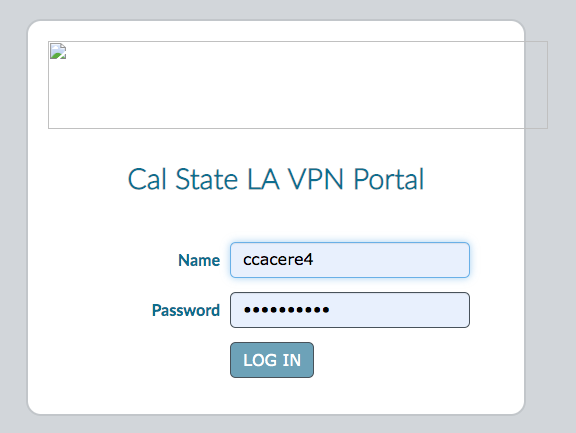
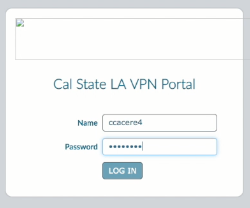
- Enter your MyCalStateLA ID sign-in username and password into the login prompt and select “Log In”
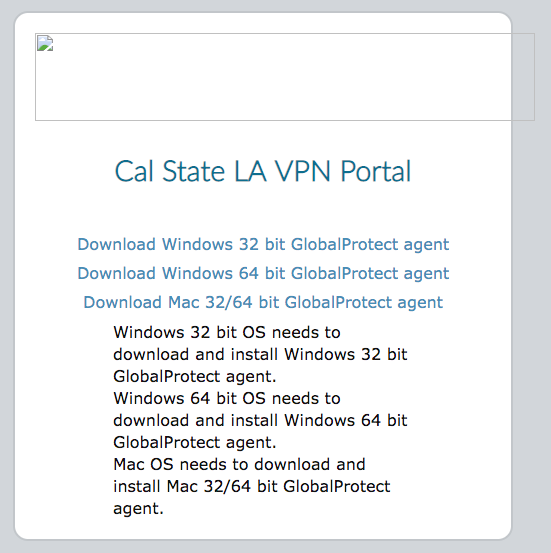
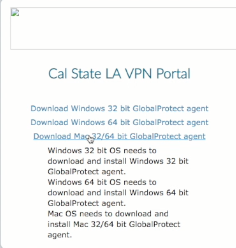
- Select the appropriate download (32 bit or 64 bit) for your operating system
- If you are unsure of your operating system information visit this Microsoft article to find out your operating system architecture
Downloading the global protect VPN software for windows
Full screen player in new tab
Find and download Globa protect VPN software - Step by step instructions
Installing VPN Software and getting connected
using microsoft windows
With the Global Protect VPN installation file now downloaded you will need to install the software.
With the software installed you will need to connecto the virtual provate network host
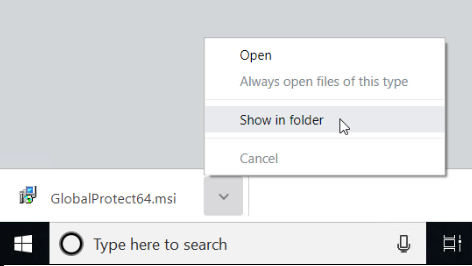
- Now that you've downloaded the installation file open it either from the bottom of the screen, where you are likely to see your recent downloads. If you do not see it there you can navigate to your downloads folder and select it there. Alternatively, you can open your downloads folder by pressing “control + J” simultaneously from most browsers
- Complete the installation prompts to install the program. It is recommended you install the program with its default installation settings.
- When complete select “finish” and the installation window should close and the GlobalProtect Log in dialog window should open automatically.
- If your login window does not open automatically after a few seconds, navigate to the start menu and find the application GlobalProtect and double click to open
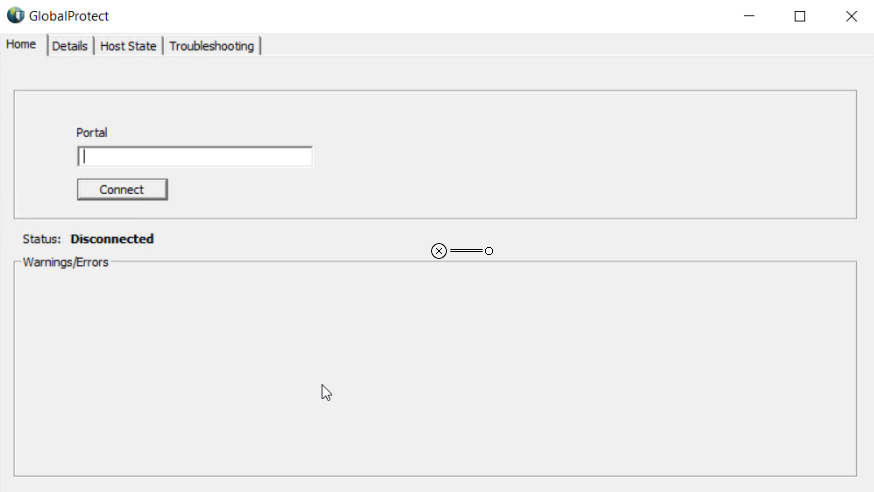
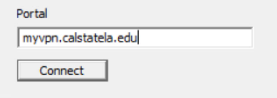
- Once the GlobalProtect software is open you will enter “myvpn.calstatela.edu” into the field and then select “Connect”
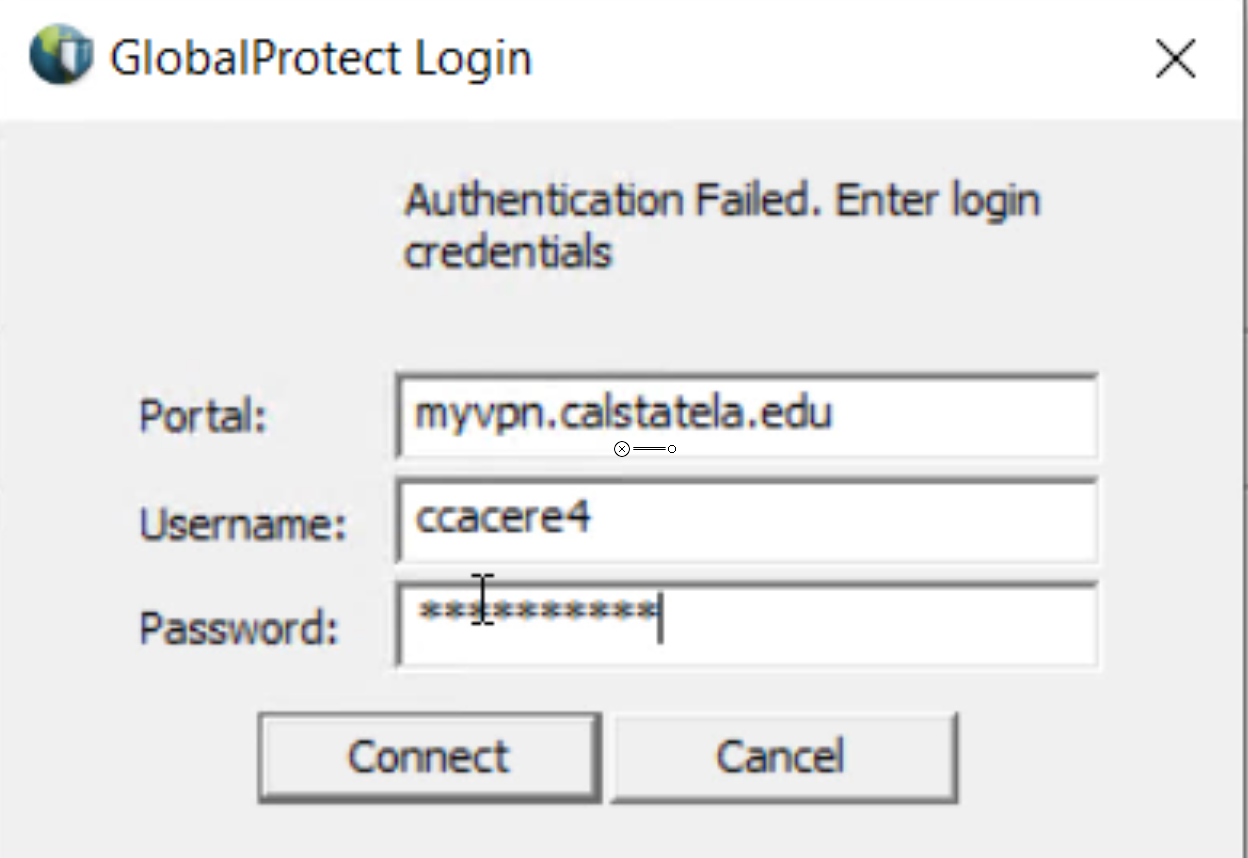
- In the user login prompt, you will need to sign in using you will need to type your MyCalStateLA ID sign in username, then type in your password and connect.
- If you see the status as “connected” in the home tab of global protect you are ready for the next step
Installing VPN Software and getting connected
Full screen player in new tab
Installing VPN Software and getting connected - Step by step instructions
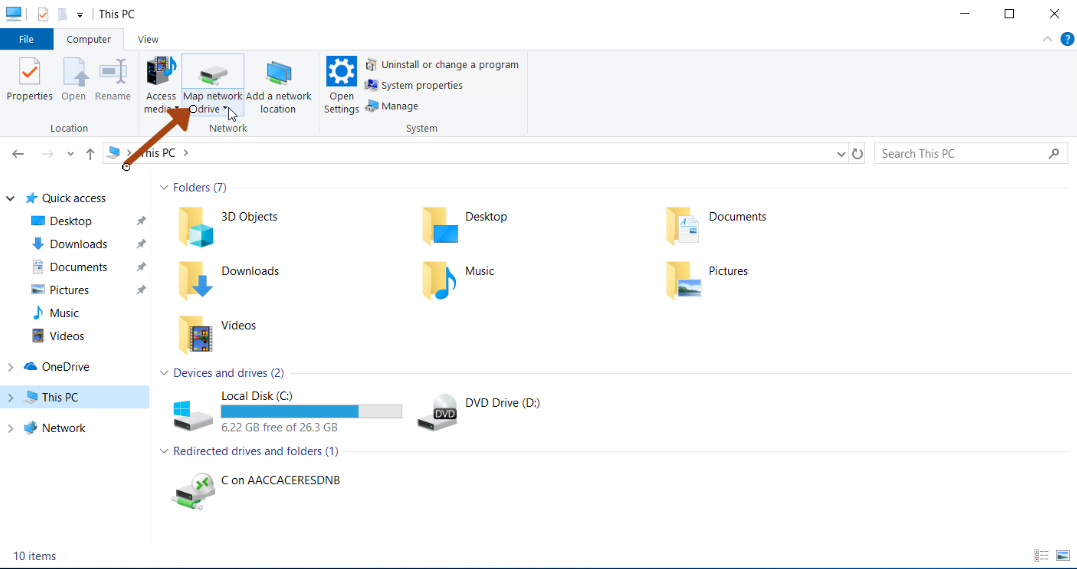
Setting up connections to CSULA server
After installing an dconnecting to the CSULA network you will net to connect to the server by adding it as a networked drive
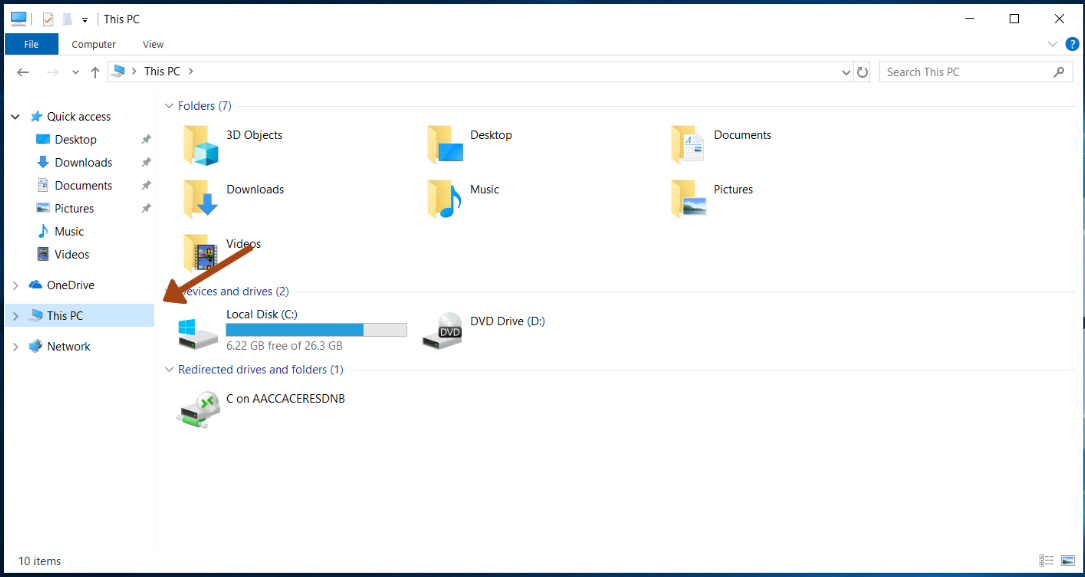
- Open a file explorer window from your windows taskbar, you can also open it from your desktop by pressing the “Windows key + E” simultaneously.

- With a file explorer window open, Click to open “This PC” on the left navigation pane
- Under the computer tab, which should open automatically, click “Map network drive”
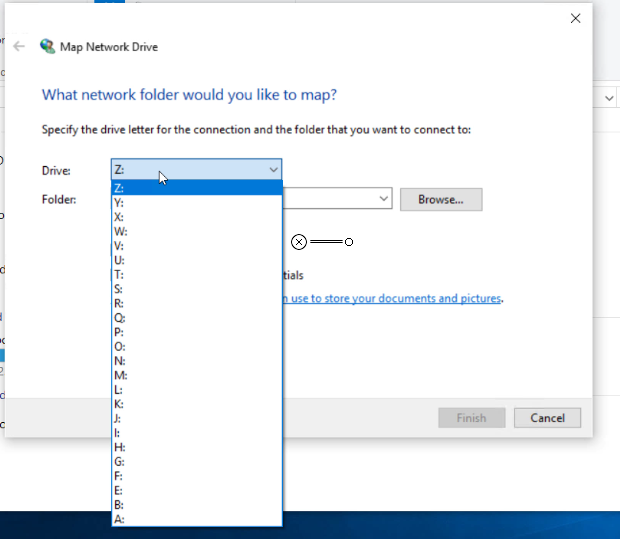
- With the Dialog open, select any drive letter of your choosing
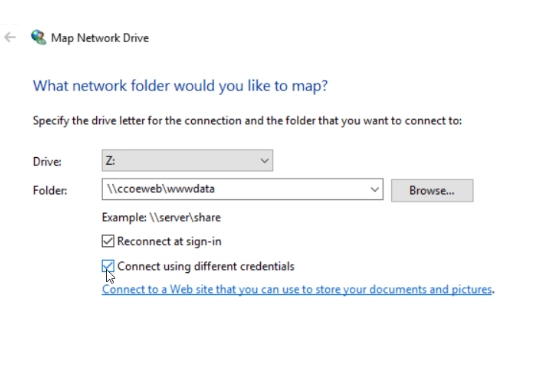
- Then in the “Folder” field type “ \\ccoeweb\wwwdata”
- It is important to select “connect using different credentials”

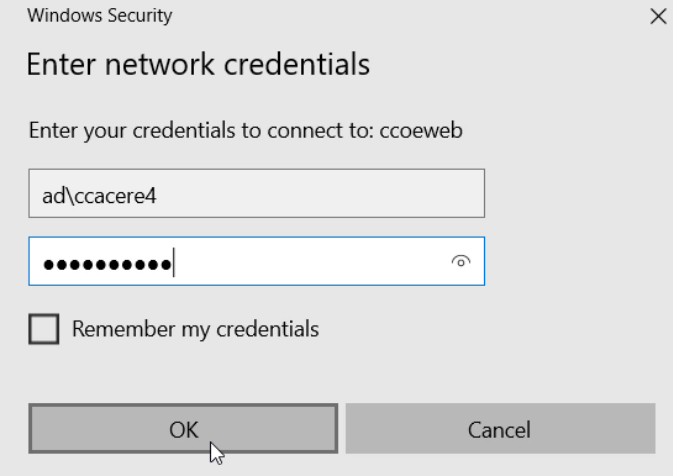
- When the login prompt comes up you will need to sign in using you will need to type “AD\” BEFORE your MyCalStateLA ID sign in username, then type in your password and connect
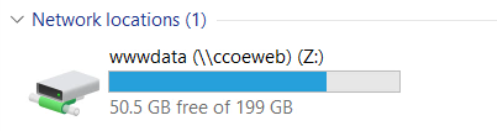
- If successful you should see your newly mapped drive at the bottom of your “This PC” file explorer window with the drive letter you chose
Setting up connections to CSULA server video
Full screen player in new tab
Setting up connections to CSULA server - Step by step instructions
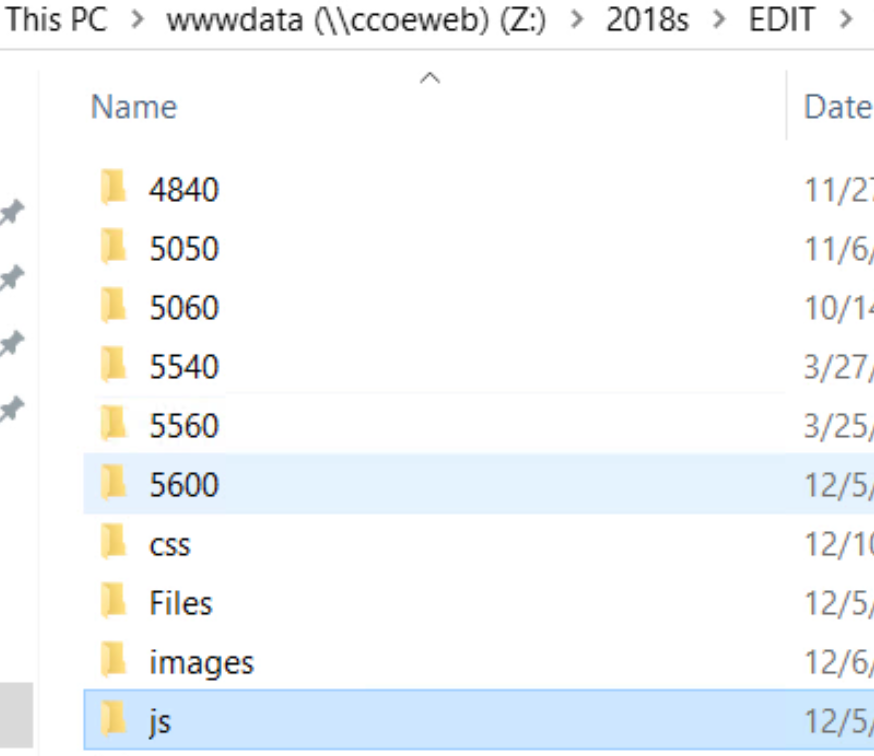
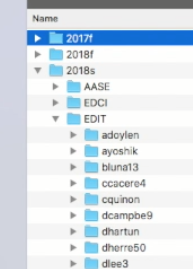
Navigating to your student folder
The last step to start using your CSULA CCOE server folder is finding it
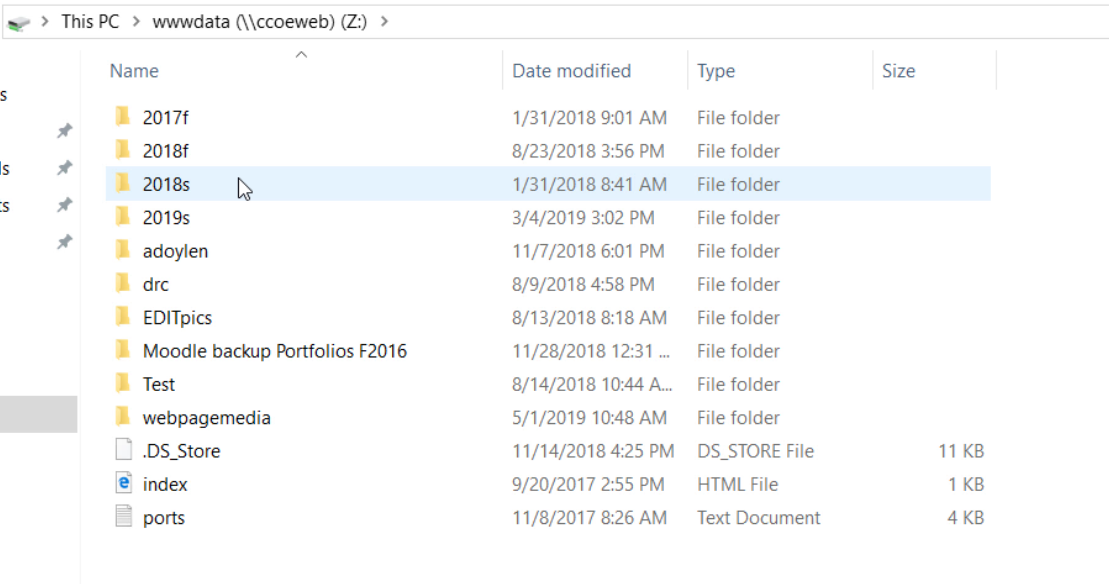
- Open the newly mapped drive
- Find and open the folder with the year and semester you started
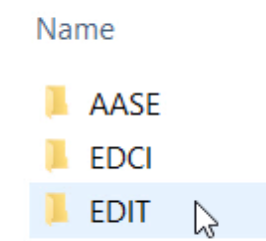
- Find and open the folder for the program you are in
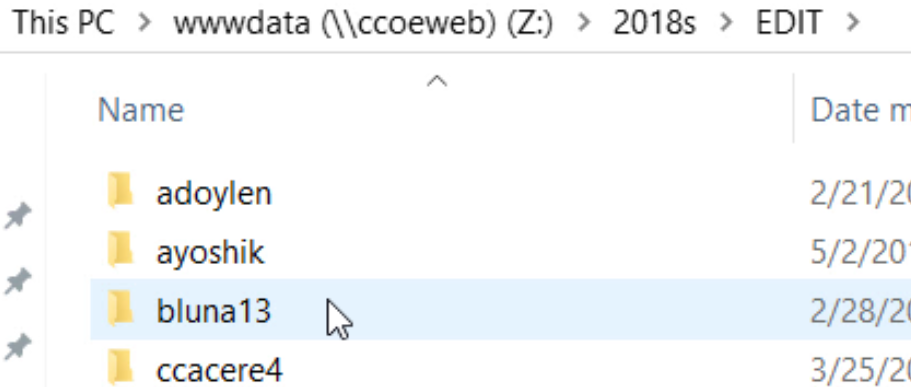
- Find and open the folder with your CSULA username
- You are ready to save in your personal student folder
Navigating to your student folder
Full screen player in new tab
Navigating to your student folder - Step by step instructions
Trouble shooting your connection Microsoft Windows
Things dont always go as planned. check out this section if you were unable to connect after following the steps above
1. Check that you have a strong internet connection
2. Check that you have the right address on the portal
3. Check that your your ussername and password is correct
4. Check that you do not have spaces in any fields
5. Check that you have the correct server address
Trouble shooting your connection with Microsoft Windows
Full screen player in new tab
Trouble shooting your connection with Microsoft Windows - Step by step instructions
Connecting your Mac to the CCOE web Server
This video will include the four steps explaing how to download the VPN host to connect to CSULA CCOE web server and how to navigate to find your file.
To acces your folder you will ned to complete the following steps. To view each step in individual detail click the link for detailed instructions or scroll below
Download school site VPN connection host
Install and set-up VPN connection program
Setting up connections to CSULA server
Navigating to your student folder
View the full video including all the steps necessary to connect Mac to the CCOE server
Full screen player in new tab
Download school site VPN connection host
for Mac O.S.
The first thing you will need to connect your Mac to the CSULA CCOE web server is to download the Global protect VPN software
- For best installation results update your computer's antivirus software and make sure you do not have multiple conflicting antivirus programs running simultaneously
- Using your preferred browser navigate to https://myvpn.calstatela.edu/
- Enter your MyCalStateLA ID sign-in username and password into the login prompt and select “Log In”
- Select the appropriate download “Mac 32/64 bit”
Download school site VPN connection host to connect Mac to the CCOE server
Full screen player in new tab
Mac OS Download school site VPN connection host Step by step instructions
Install and set-up VPN connection program
for Mac O.S.
Next you will need Install and set-up VPN connection program to the CSULA CCOE web server
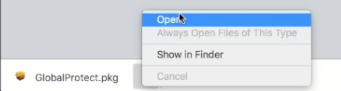
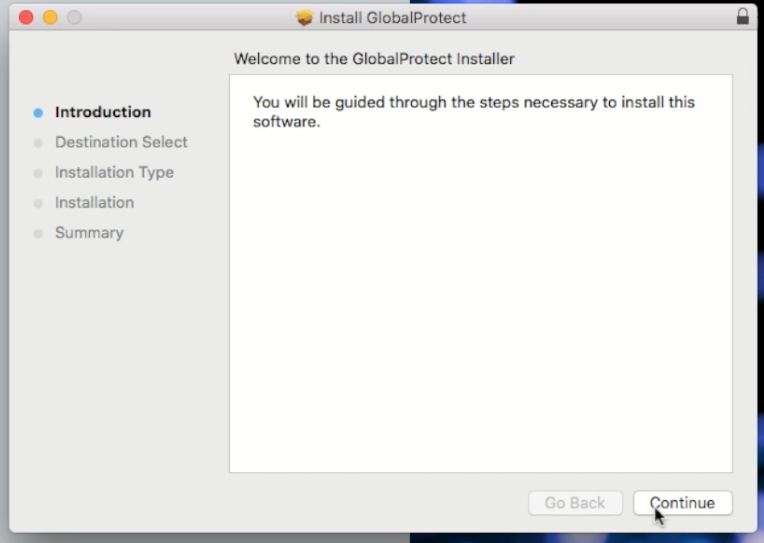
- Now that you've downloaded the installation file open it either from the bottom of the screen in your web browser, where you are likely to see your recent downloads. If you do not see it there you can navigate to your downloads folder and select it there. Alternatively, you can open your downloads folder by pressing “command + option + L” simultaneously from most browsers or the desktop Complete the installation prompts to install the program. It is recommended you install the program with its default installation settings. You might need to provide the administrator password to continue the installation.
- When complete select “finish” and the installation window should close and the GlobalProtect Log in dialog window should open automatically.
- If your login window does not open automatically after a few seconds, navigate to the applications folder and find the application GlobalProtect and double click to open
- Once the GlobalProtect software is open you will enter “myvpn.calstatela.edu” into the field and then select “Connect”
- In the user login prompt, you will need to sign in using you will need to type “AD\” BEFORE your MyCalStateLA ID sign in username, then type in your password and connect.
- If you see the status as “connected” in the home tab of global protect you are ready for the next step
Install and set-up VPN connection program to connect Mac to the CCOE server
Full screen player in new tab
Mac OS Install and set-up VPN connection program Step by step instructions
Setting up connections to CSULA server
for Mac O.S.
http://ccoeweb.calstatela.edu/2018s/EDIT/ccacere4/techtraining/CSULAVPN.html
- Now that you've downloaded the installation file open it either from the bottom of the screen in your web browser, where you are likely to see your recent downloads. If you do not see it there you can navigate to your downloads folder and select it there. Alternatively, you can open your downloads folder by pressing “command + option + L” simultaneously from most browsers or the desktop Complete the installation prompts to install the program. It is recommended you install the program with its default installation settings. You might need to provide the administrator password to continue the installation.
- When complete select “finish” and the installation window should close and the GlobalProtect Log in dialog window should open automatically.
- If your login window does not open automatically after a few seconds, navigate to the applications folder and find the application GlobalProtect and double click to open
- Once the GlobalProtect software is open you will enter “myvpn.calstatela.edu” into the field and then select “Connect”
- In the user login prompt, you will need to sign in using you will need to type “AD\” BEFORE your MyCalStateLA ID sign in username, then type in your password and connect.
- If you see the status as “connected” in the home tab of global protect you are ready for the next step
Setting up connections to CSULA server to connect Mac to the CCOE server
Full screen player in new tab
Mac OS Setting up connections to CSULA server Step by step instructions
Navigating to your CCOE server student folder
for Mac O.S.
Last you will need to navigate to your student folder
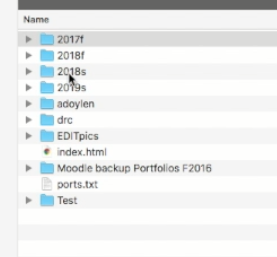
- Find and open the folder with the year and semester you started
- Find and open the folder for the program you are in
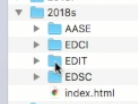
- Find and open the folder with your CSULA username
- You are ready to save in your personal student folder
Navigating to your student folder in your on the CCOE server
Full screen player in new tab
Navigating to your student folder on CSULA CCOE server Step by step instructions
Trouble shooting your connection with MacOS
Things dont always go as planned. check out this section if you were unable to connect after following the steps above
1. Check that you have a strong internet connection
2. Check that you have the right address on the portal
3. Check that your your ussername and password is correct
4. Check that you do not have spaces in any fields
5. Check that you have the correct server address
Trouble shooting your connection with MacOS
Full screen player in new tab
Trouble shooting your connection with MacOS - Step by step instructions